Using the colour picker and pipette
The colour panel opens as soon as you click Background or Card. Pick a ready-made colour, or take a shade from your own photo.
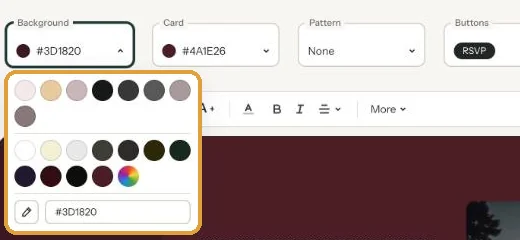
At the top: from your design
The first row shows the colours of the text on your card and the main colours from your own photo. Handy when everything needs to match. A sample photo doesn’t count; the row only appears when there’s something to show.
Below: standard colours
The background and card colours from the save the date designs, from light to dark. Under Background you’ll also find your current card colour, and the other way round, so you can make the two the same in one click.
The last circle, with every colour of the rainbow, is the colour wheel. It opens your browser’s colour picker, for when you want to slide around yourself.
At the bottom: pipette and colour code
- Pipette. Click the small pipette at the bottom left, then a colour in your invitation, such as the flowers in your photo. In Chrome and Edge on a computer you can also click a colour anywhere else on your screen.
- Colour code. Type a code such as #A3B18A into the box and press Enter. Handy for matching brand colours or printed stationery exactly.
You get the same panel for the text colour in the text bar. A highlight is under More, with five soft colours and a colour wheel. Click anywhere outside the panel to close it.
Next step: Editing and formatting text
Last updated: November 11, 2026
- Designing your invitation: the basics
- Choosing a layout
- Choosing the background and card colour
- Using the colour picker and pipette
- Editing and formatting text
- Replacing the example text with your own details
- A new look in seconds with Redesign
- Undoing changes
- Moving and aligning text
- Showing or hiding text frames
- Adding a pattern
- Adding a link to your text
- Customising a ready-made design
- Using keyboard shortcuts