Adding a pattern
A pattern gives your invitation a bit more character than a plain colour. You choose it in the Pattern field at the top of the builder.
Choosing a pattern
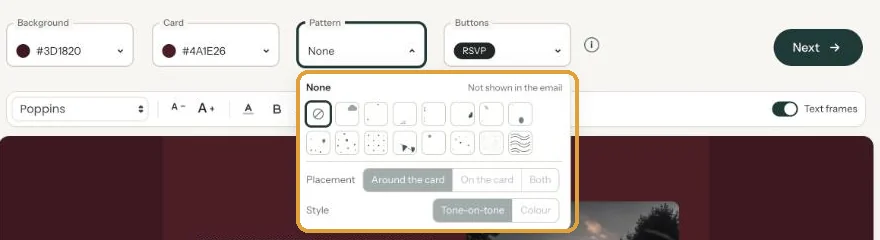
- Click Pattern. A panel with sixteen tiles opens right below the field.
- Click a tile, for example Clouds, Eucalyptus or Star shower. Its name appears at the top of the panel, and you see the pattern on your invitation straight away.
- Under Placement, choose Around the card, On the card or Both.
- Under Style, choose Tone-on-tone or Colour.
- Click outside the panel or press Esc to close it.
Placement and style
Around the card is the calmest option, because your text stays on a plain surface. On the card, the pattern is softer so the text stays readable. Tone-on-tone stays close to your own colours; Colour makes the pattern stand out more.
The pattern adapts to light and dark colours. If you change the background or card colour later, there’s no need to set the pattern up again.
Removing a pattern
Open the panel and click the first tile, the circle with a diagonal line. That’s None.
Not shown in the email. The email with your invitation doesn’t include the pattern. Guests do see it on the web page.
Next step: Adding a link to your text
Last updated: November 11, 2026
- Designing your invitation: the basics
- Choosing a layout
- Choosing the background and card colour
- Using the colour picker and pipette
- Editing and formatting text
- Replacing the example text with your own details
- A new look in seconds with Redesign
- Undoing changes
- Moving and aligning text
- Showing or hiding text frames
- Adding a pattern
- Adding a link to your text
- Customising a ready-made design
- Using keyboard shortcuts